Install NixOS on a Free Oracle Cloud VM
Oracle is not a very popular cloud hosting service, but they have an unusually attractive free tier offering. You can run the following two VMs for free 24/7:
- 2 CPU / 12 GB RAM Ampere A1 ARM VM
- 1 CPU / 1 GB RAM AMD CPU
The challenge: Install NixOS on an Oracle Cloud VM 🔗︎
Oracle doesn’t offer NixOS as one of the OS options for its VMs, and I’ve read reports that uploading a NixOS image doesn’t work either.
I’ve found several tutorials about installing NixOS on Oracle’s ARM VM, but they all seemed complicated and involved a lot of manual steps.
Prithu Goswami figured out a clever shortcut by using the NixOS installer through netboot, which simplifies things. Prithu’s explanation was pretty terse, so I thought I’d share my complete walkthrough of his method.
Requirements 🔗︎
There are no pre-requisites except that you’ll need an SSH client on your local system.
ssh
Step 1: Get an Oracle Cloud account 🔗︎
I unfortunately can’t help much with this step, as I did it several months ago and don’t remember the process.
I do know that Oracle kept closing my account for opaque reasons before I even tried any of the cloud services, and I had to email support to get my account restored.
Note that you can only create free-tier VMs in your home region, and I’m not sure which regions have the most capacity.
I chose a home region of US-ASHBURN, which has free-tier VMs.
Step 2: Create a free-tier VM 🔗︎
Once you’re logged in to your Oracle Cloud account, create your free VM:
- Go to Create compute instance.
- Change the name to whatever you want.
- Under “Image and shape,” choose the image Ubuntu >
Canonical Ubuntu 24.04 Minimal aarch64. - Under “Image and shape,” choose the shape
VM.Standard.A1.Flexand increase the number of OCPUs to2. RAM should auto-update to12GB.
The image and shape screen should look like this:

Verify that the reported cost for “Shape” is $0.
Under “Add SSH keys,” upload your SSH public key.
Finally, hit “Create” to create the VM.
Step 3: Log in over SSH 🔗︎
Wait until your VM shows as running:

Once your VM is running, open a terminal on your local system.
Copy your VM’s public IP address:
VM_IP='1.2.3.4' # Replace with your VM's IP.
SSH into your newly-created VM with your SSH keys:
ssh "ubuntu@${VM_IP}"
Step 4: Download netboot 🔗︎
From your SSH session to your VM, download netboot, a minimal meta-OS for installing other OSes.
To begin, elevate to the root user:
sudo su
Download the netboot ARM64 image to /boot/efi/netboot.efi:
wget https://boot.netboot.xyz/ipxe/netboot.xyz-arm64.efi && \
  sudo install \
    --owner=root \
    --group=root \
    --mode=664 \
    netboot.xyz-arm64.efi \
    /boot/efi/netboot.efi
Step 5: Boot into EFI boot manager using Cloud Shell 🔗︎
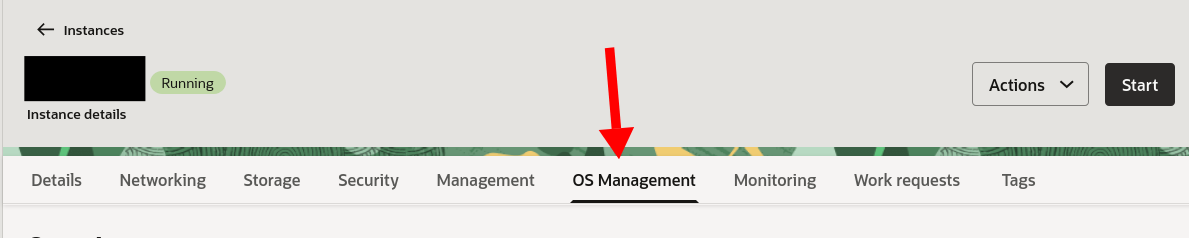
Go back to the VM page for your instance on Oracle Cloud in your web browser.
Click “OS management”
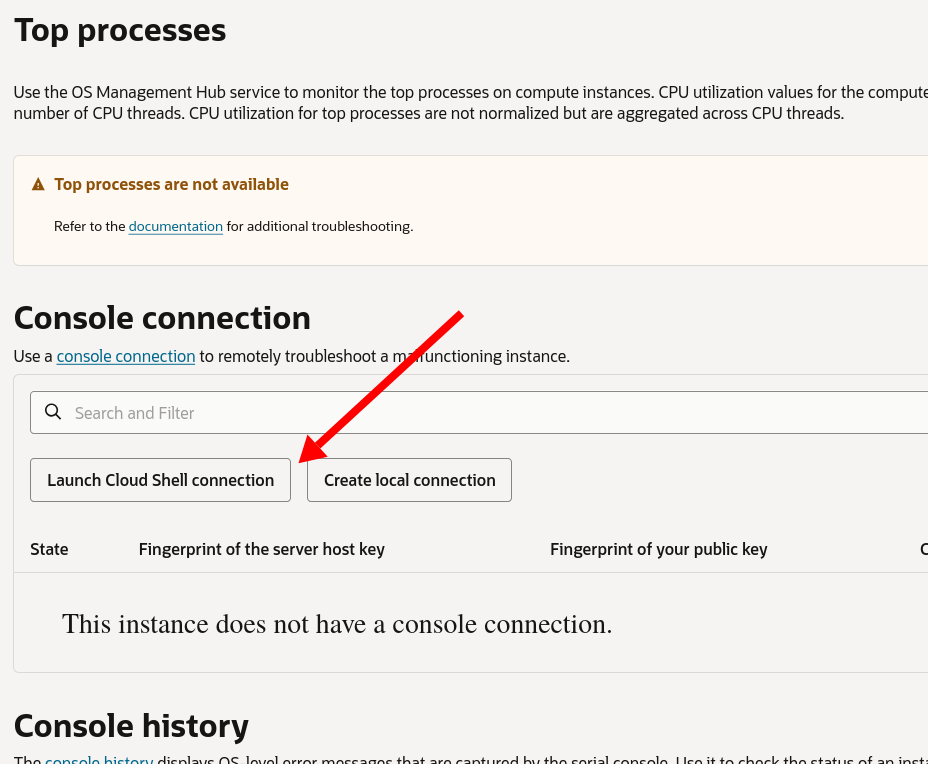
Scroll down, and click “Launch Cloud Shell connection.”
When the Cloud Shell is initialized, you should see this line:
Instance Console Connection reached state: ACTIVE
From your SSH session, reboot your VM:
reboot
Quickly, switch over to Cloud Shell in your browser. Click on the remote screen and then keep hitting the Escape key on your keyboard as the system reboots.
If you do it correctly, you should see the EFI boot manager:

From the boot screen, go to Boot Manager > EFI Internal Shell.

Press any key to skip startup.nsh.
From the EFI Shell prompt, type:
fs0:netboot.efi
When netboot launches, choose the following options:
- Distributions > Linux Network Installs (arm64)
NixOSNixOS nixos-24.11
netboot will then load you into the NixOS live installer.
Step 7: Configure SSH access for the NixOS installer 🔗︎
After choosing NixOS from netboot, the system should automatically log you in as user nixos with no password prompt.
You can theoretically do the remaining steps through the Cloud Shell, but it’s probably easier if you can SSH in with your standard terminal utility.
The NixOS installer unfortunately does not konw about the SSH public key you uploaded when you created the VM, so you’ll need to get your SSH key on the VM again.
If you have your SSH keys registered with Github, an easy way to provision SSH keys is by running the following commands:
GITHUB_USERNAME='your-github-username'
mkdir -p ~/.ssh && \
  curl "https://github.com/${GITHUB_USERNAME}.keys" > ~/.ssh/authorized_keys
Alternatively, you can just paste any of you SSH public keys into ~/.ssh/authorized_keys.
Once your SSH keys are in place, go back to your standard terminal, and SSH in again, this time to the NixOS install environment:
ssh "nixos@${VM_IP}"
Step 8: Repartition the cloud VM’s disk 🔗︎
At this point, you’re in the NixOS installer, but the disk still has Ubuntu installed on it. You need to wipe and repartition the disk for NixOS.
From your SSH session to the VM, elevate to root.
sudo su
Next, change to a temporary directory:
cd "$(mktemp --directory)"
From here, download the disk configuration file I’ve created. It reserves 500 MB for a boot partition and uses the rest of the disk for NixOS.
curl \
  --show-error \
  --fail \
  https://mtlynch.io/notes/nix-oracle-cloud/disk-config.nix \
  > disk-config.nix
Next, use disko to apply the disk partitioning configuration to the VM’s disk:
nix \
  --experimental-features 'nix-command flakes' \
  run \
  github:nix-community/disko/v1.11.0 \
  -- \
  --mode destroy,format,mount \
  disk-config.nix
When prompted, say “yes” to deleting all data.
Step 9: Install NixOS 🔗︎
At this point, you have a freshly-partitioned disk. It’s time to install NixOS.
To begin, generate a placeholder configuration:
nixos-generate-config --no-filesystems --root /mnt
Move the disk configuration you created in the previous step to /mnt/etc/nixos/ with the rest of your NixOS configuration files:
mv disk-config.nix /mnt/etc/nixos/
Next, download the Nix configuration files I prepared for this Oracle Cloud VM:
curl \
  --show-error \
  --fail \
  https://mtlynch.io/notes/nix-oracle-cloud/configuration.nix \
  > /mnt/etc/nixos/configuration.nix && \
  curl \
    --show-error \
    --fail \
    https://mtlynch.io/notes/nix-oracle-cloud/vars.nix \
    > /mnt/etc/nixos/vars.nix
I split out all the values you’re likely to change into a file called vars.nix:
{
  hostname = "cloudnix";        # Replace with your desired hostname.
  username = "mike";            # Replace with your desired username.
  sshKey = "ssh-rsa AAAAB3..."; # Replace with your SSH public key.
  locale = "en_US.UTF-8";
  timezone = "America/New_York";
}
Open vars.nix and change the settings to match your desired values.
nano /mnt/etc/nixos/vars.nix
Feel free to tinker with configuration.nix as well, but you can also change the files after you complete the initial install.
Once you’ve customized your configuration.nix and vars.nix, start the NixOS install:
nixos-install --no-root-password
When the install completes, reboot the VM:
shutdown --reboot now
Step 10: Log in to your new NixOS system 🔗︎
The first boot will take about a minute. When it’s ready, go to your terminal, and SSH in using the same IP address you used earlier:
ssh "${VM_IP}"
You’re done! You now have a free 4-CPU VM running on Oracle’s cloud with NixOS installed.
If you run neofetch, you should see output like the screenshot below:
nix-shell -p neofetch --command neofetch

Step 11: (optional) Install a package 🔗︎
At this point, everything’s done, but you may want to test something to make sure your NixOS configuration is in a healthy state.
Open your configuration.nix in a text editor:
sudo nano /etc/nixos/configuration.nix
Find the environment.systemPackages setting, and try adding ffmpeg to the list:
curl
ffmpeg  # Add this line
git
vim
Next, apply the configuration with nixos-rebuild:
sudo nixos-rebuild switch
Now, you should see that ffmpeg is available on your system:
$ ffmpeg -version | head -n 2
ffmpeg version 7.1 Copyright (c) 2000-2024 the FFmpeg developers
built with gcc 13.3.0 (GCC)
Read My Book

I'm writing a book of simple techniques to help developers improve their writing.
My book will teach you how to:
- Create clear and pleasant software tutorials
- Attract readers and customers through blogging
- Write effective emails
- Minimize pain in writing design documents
Be the first to know when I post cool stuff
Subscribe to get my latest posts by email.